Screen printing in general
Screen printing is a really excellent practice that has a wide variety of applications within DIY fabrication. Anything from circuit boards,
to packaging material, to promotional material, to conductive ink, to ... grease or whatever you can think of can be screen printed.
It yields excellent results and is easily scalable from a dirt cheap simple setup to a (still really cheap) professional work station.
At Knas we only deal with acrylic screen printing inks, this because solvent based inks are - of course - tremendously bad for anything living,
and really, not necessary to deal with. The longevity of acrylic inks vs solvent based is of course not comparable, but in my mind it's
better for a print to get a little messed up as time goes by, than for the people who does the prints brains, to gets messed up.
We screen print both powder coated aluminium and brushed aluminium with acrylic and then simply cover it in a few quick layers of clear coat afterwards (i should say that i really wish i could skip the clear coating as it's really not that great, but i haven't found a good substitute so far. I have tried using water based polyurethane but it's too drippy.). The brushed aluminium takes the acrylic quite
excellently and is really easy to work with, the powder coat is a struggle but it works after much trial and error.
The basics of screen printing
The idea of screen printing is simple; you place the object you want to print on on a table, you then put a stencil on the object that has
cutouts where you want the paint to pass through, the cutouts forming the image of your print. You squeege paint across the entire stencil and there you go, your object has been printed. Now the stencil is generally
actually a screen made out of a fine mesh, the mesh is covered in a UV reactive paint (emulsion) that only hardens when hit with UV light.
To create a screen you cover the screen in emulsion and wait about 20 minutes so that the emulsion isn't totally wet. You then put a transparent printout of the image you want to create a screen of in between your UV light source and the screen and turn the light on for a bit. The transparency should be monochrome and have black areas where you want the paint to go through the screen (where you want to print),
it's also VERY important that the transparancy is evenly placed against the screen so there's no blurring. You can use a sheet of glass or
plexi glass in between the light and the transparancy, and a couple of weights on the screen - or use a vacuum suction top (which is
suprisingly easy to build). After exposure you wash the screen, the emulsion should come off where the black areas of the transparency has blocked the UV light rays and thus the paint has been unable to cure.
The things that you need to make screen printing happen are:
- A screen
- Emulsion
- A transparent printout of your image
- Screen printing ink
- Squeege
- A UV light source
- A way to wash off the uncured ink
Most of these things you can get at any local art store for a few bucks, you can do ok transparancies at any local printshop or at home. However, please note that inkjets are not very good at printing solid blacks so if you use that you might have to layer several prints on
top of each other to get a "true" black.
Your UV light source can be a fancy light box, a "sun lamp", or just simply the sun (put your screen outside with the transparency up and a
sheet of plexiglass to hold it all down). You can either wash the screen in the shower, or you can use a power washer. While all of these
methods work, the more expensive ones will in fact give you better results. To make a few awesome crusty shirts you don't need anything
fancy, to develop 0.1mm lines that are perfectly spaced you kinda do.
Circuit boards
Okay so i mentioned that you can screen print circuit boards; obviously you can screen print the component legend on the finished board,
however more interesting is the fact that you can use a well-built UV exposure unit to develop the circuit board traces photographically
before etching. Using a collimating grid (i'll come to that) you can get down to 0.1mm spacing (4 mil) which is quite remarkable.
It's also quite doable to make double sided boards with VIAs and the whole shebang. Furthermore
this is something you can do in a fairly efficient way as you can make as many copies as you want from one single set of transparancies.
Obviously, it's never (or at least not with some serious ass effort) going to be as good as fab-made PCBs, however as anyone who's done
prototyping knows, if you're only going to make a few boards it might be worth the trouble in order to save the enormous overhead cost
that just a few boards incurs.
anyway
The basic UV Exposure unit
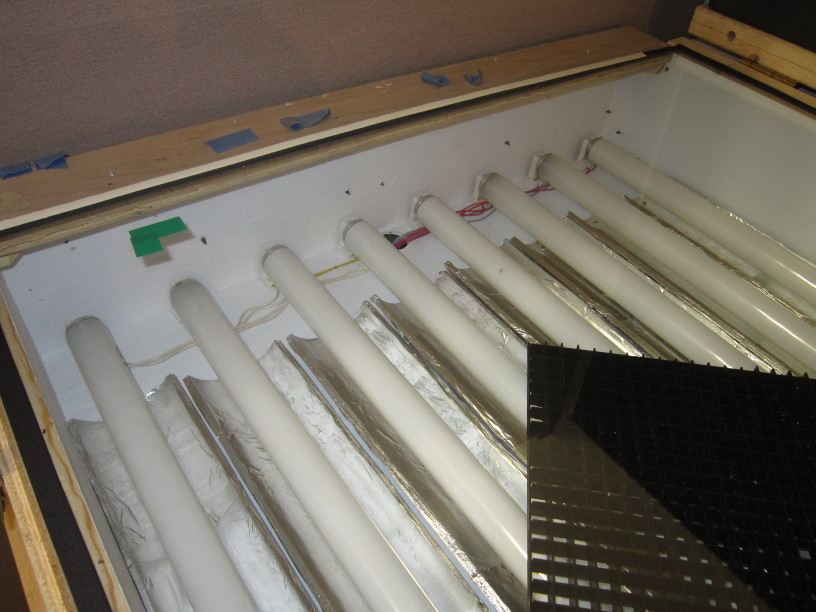
Ok so to make the basic UV Exposure unit you need a few things;
- A piece of glass
- Fluorescent light fixture(s) (F40/T12 size)
- Wood
- White paint
- Fluorescent UV tubes (GE 10526)
I got my glass from a used window i got at a house reclamation center that sells used building
materials. The light fixture you should be able to get from the same type of place, the thing about buying an entire fixture is that you
generally get the fluorescent tube holders, the ballasts and the sparkplugs (if any) as a packge deal. It took me a while to find the
right fluorescent tubes, you basically need blacklights without the purple coating. Screen printing supply stores sell these for like $20
a piece which was way too much for me as i needed 8 of them. I ended up buying them for about $5 a piece from
www.1000bulbs.com
The construction is really simple; make a box that fits all the lights and get a piece of glass that fits over it, paint the box white so
that the reflectiveness of the box is maximized - that's really it. I made it so that the glass just rests on top of the box, being held
down by its own weight. That way it's quite easy to slide the glass off if you need to change bulbs or do any other type of maintenace.
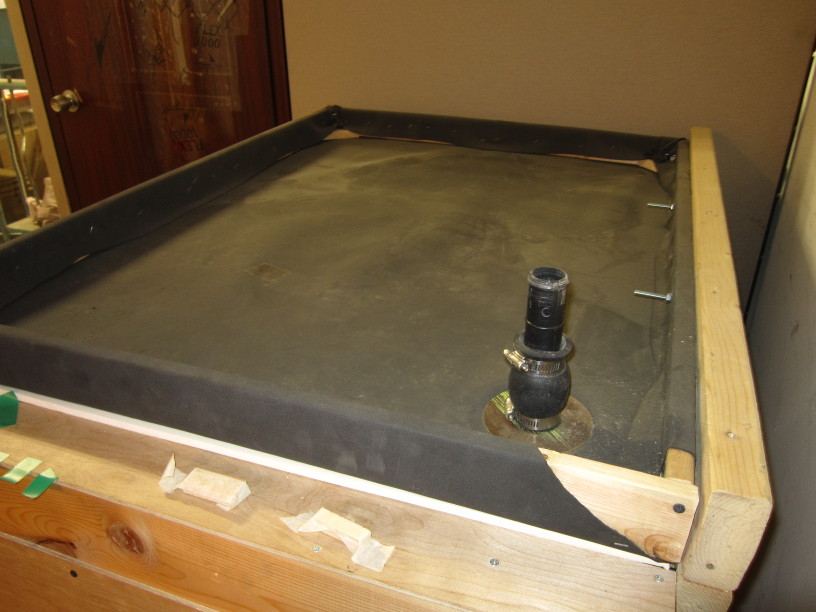
Vacuum suction top
I recommend making a vacuum suction top, it's not strictly necessary but it's so easy and cheap and will be of great help that it's worth
it. What you need is:
- A piece of 1/16" neoprene ($22 for a roll from newegg, product no 9SIA1JU0PE0013)
- 1/4" self-adhesive window sealant foam
- A vacuum source (vacuum cleaner works fine)
- A staple gun
- Wood
- Hinges
- Some clasps (to hold the lid down)
- A tube that fits the vacuum sources inlet so you can hook it up

The neoprene top should be the size of the glass that you are using, or perhaps slightly smaller. It should *not* be larger as we're going
to use the property of glass that it is entirely air tight.
Now the thing about neoprene is that once it rips it likes to just continue ripping, therefore you have to try and avoid having too much
tension of the neoprene where the staples are, or they will create rips. It's a good ide to fold the neoprene over the edge and staple
it on the inside, this way the tension will be more towards the folds and not as much directly on the staples.
Once the neoprene is stapled to the frame you need to create a way for the vacuum source to be hooked up, easiest way is to make a T-shape
tube that connects to the vacuum source. Again it's important to avoid ripping of the neoprene so everything should be round - no sharp
corners, the hookup also needs to be sealed properly (you can use tape, it's fine).
Now decide the placement of the neoprene top, screw it down with the hinges and the clasps - make it tight. It will not be tight enough
to keep the suction regardless of what you do, so afterwards, line the glass with the window sealant foam along the edge of the vacuum
suction top. Done!
Reflectors
When building a UV exposure unit it's not just about how *much* UV light you can produce, but also how evenly it's being distributed -
if it's too uneven you can endup overexposing some parts of an object, while underexposing others. To make the light distribution more
evenly you can add reflectors under the UV lights. To make some cheap reflectors you need:
- 4" x 10' PVC water pipe
- Aluminium foil
- Spray glue
Simply cut the water pipe into 1/3 circumference so you have three 120 degree angles, now cut those to be just so long that they'll fit
under the UV tubes. For each one, spray it with the adhesive on the inside of the pipe and cover it in aluminium foil. Done.
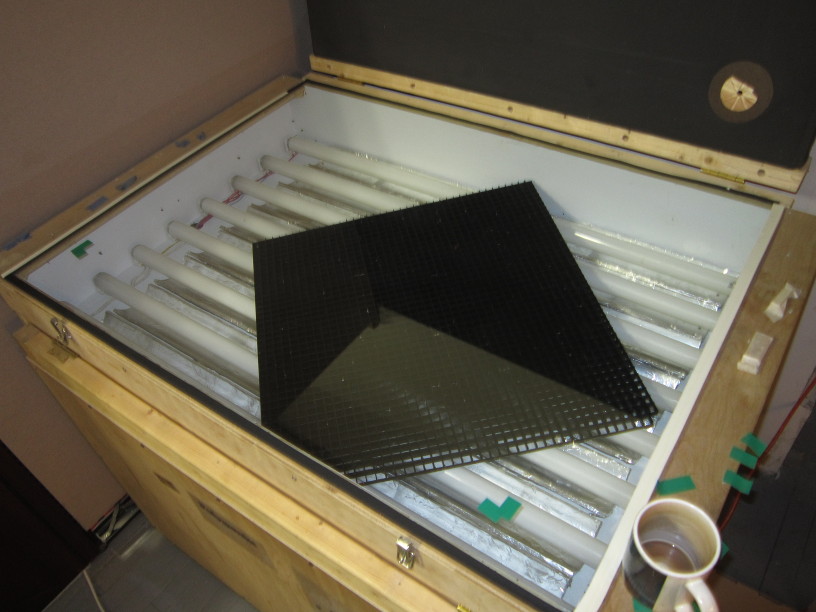
Collimating grid
To achieve extreme detail necessary for making circuit boards, you may have to use a "collimating grid". Simply put, this is a grid thats
placed in between the UV tubes and the glass, my grid is 2" tall and has a square every 1" - it also needs to be painted black. The idea is
that lightrays coming at a too extreme angle gets suppressed, you do this so they can't sneak in under your transparancy and expose parts
that are supposed to be blocked. Think & Tinker has some more information on this topic
here. I built my collimating grid from the grid that covers the very same fluorescent light fixtures
that i used for my UV lights, i spray painted it black, chopped it in half and glued the two pieces together stacked on top of each other.
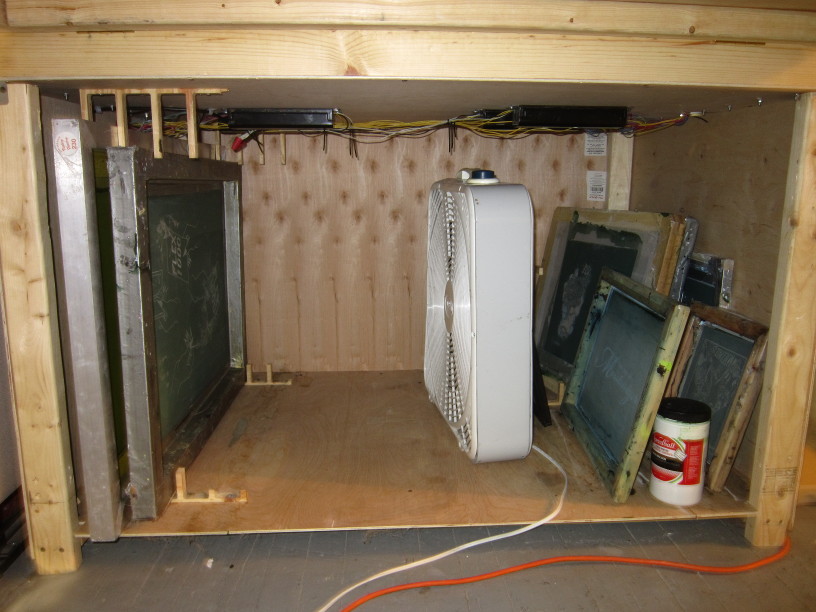
Storage
While working with screen printing you'll have to have a dark place to store both screens before developing and supplies. Unless you're
building a bench-top machine, utilizing the space under neath the UV exposure unit is perfect for this.
