Tape feeder overview
One of the things that are lacking in most DIY pick-and-place design is cheap & reliable alternatives for commercial tape feeders. After looking around i decided
to try and make my own design as i found most things to be lacking in one area or another.
The requirements set for this design were that it should be cheap, it should be easy to make (given that you have access to a CNC router), it should be reliable
and have no cumulative error, it should not require any esoteric electronic, it should not require any extra movements from the pick-and-place (as that would slow
down placing too much) and it should be quite independent from overall machine calibrations. I also wanted it to be modular as there are several combinations of
holes per component and tape widths, as of current (2015-12-17) the design works well with 8mm, 12mm and 16mm tape with 1 or 2 holes component separation,
either paper or plastic tape. I am
slowly making designs for 3 & 4 holes separation as well as 20 & 24mm tape.
After spending about six months of designing, testing & prototyping i came up with an all mechanical design that is actuated from the pick-and-place heads
downgoing movement as it picks up a component. The head depressed a lever on the feeder that forwards the component reel to a given position that once actuated,
is held by a small plunger. The part of the head that is actuating the lever is spring loaded so that the downgoing movement does not need to be exact,
as long as it passes the point of actuation. The tape is also forwarded on the heads upgoing movement, though this only forwards the tape about half the required
way - the rest is on the next downgoing movement. To achieve this motion with no cumulative error the feeding mechanism is using escapement gears, feeding the tape
*exactly* 4mm for one up-down cycle of the lever. The feeder
also utilizes a magnet at the front which drags the components down and to the left just before exiting the feeder, this makes for a more predictable placement
within the tape pocket.
The material cost for one of these feeders is somewhere around $3-$5 US, a single feeder might take you about 45 minutes to make but if making them in bulk it should
be able to be faster.
Materials and construction
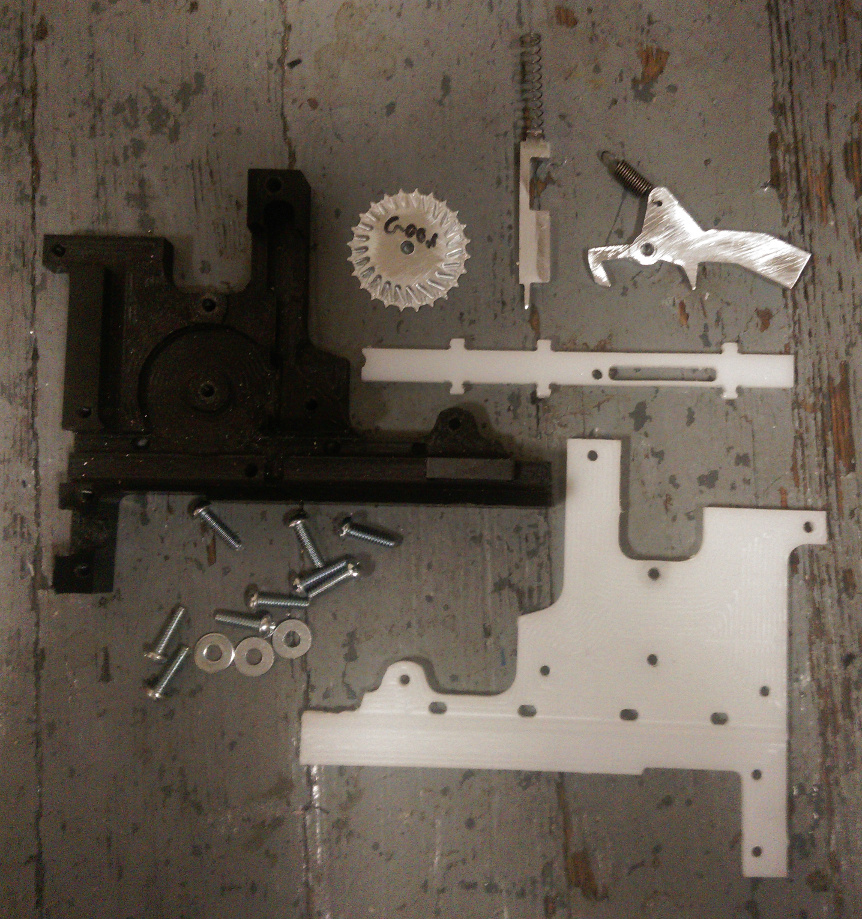
The housing for the feeders is made out of HDPE, i tried using plexiglass at one point but it's too brittle and it also requires a whole lot of sanding down in
order to be smooth enough for the mechanics to work well. It's quite possible that the housing could be 3d printed, i have only tried making them with a cnc
router.
The mechanics of the feeders are made out of aluminium, i tried using plastics but the force and detail required makes this a no-go. Preferably i'd use waterjet
cut steel but until someone gives me a waterjet that's probably not going to happen.
To make a single 8mm feeder you need:
- One sheet of 1/8" (3.175mm) thick HDPE (using about 145 x 100 mm 7" x 4")
- One sheet of 1/2" (12.7mm) thick HDPE (using about 120 x 100 mm / 6" x 4")
- One sheet of 1/8" (3.175mm) thick aluminium (using about 75 x 50 mm / 3" x 2")
- One *very light action* 1" (2.54mm) compression spring, i use these: McMaster-Carr 9657K66
- One medium strength 0.7" (1.77mm) extension spring, i use these: All Electronics Spr-5
- One magnet (optional) 3x16" (4.76mm) thick by 7x8"L (22.22mm) x 1/4"W (6.35mm), i use these: Do it best 362743 (Crown Bolt 96224)
- nine 6-32 x 1/2" panhead philips screws
- three #6 washers
To make this with a cnc router you need:
- One 1/8" (3.175mm) endmill for plastics (suggesting Onsrud 63-700)
- One 1/8" (3.175mm) endmill for aluminium (suggesting Onsrud 63-610)
- One 1/16" (1.5875mm) endmill for aluminium (suggesting onsrud 63-602)
Once everything is cut and done all the aluminium parts needs to be filed and possibly sanded down for smooth action. Depending on the quality of your cnc router,
endmill and cutting speed the plastic parts may have to be sanded a bit too.
Start by attaching the magnet in the front of the feeder body, attach the tape cover and then attach the compression spring to the plunger and insert the assembly into the feeder body. Make sure the plunger
moves very smoothly up and down, if not you might need to do more sanding. The plungers compression spring needs to be VERY light action, it's just supposed to be
barely over what gravity would do itself. Next up attach the escapement gear to the body with a screw and washer, attach the extension spring to the lever arm and
attach that too with a screw and washer.
Try out the feeders action, it should move very smoothly and there should be next to no force necessarry to pull the lever up - the compression spring on the plunger
should force the lever down when it's not actuated. If this all works, attach a screw in the top right hole and put the extension spring from the lever arm around the
screw body. Now test it with a piece of component tape. At each push-down on the arm the tape should move to the *exact* same location each time, there should be
very little force having to be used in order to push down the lever. The front magnet should sandwich the tape in between itself and the tape cover but should in no
way impede the tapes movements.
If everything is good to go, remove the screws and use some smaller screws from the back of the feeder body in the gear and lever hole - these are used to hold the
gear, lever and their respective washers in place while you put on the cover and secur them with their actual, larger screws. Put the gear and lever on
their respective screws and put one washer on top of the lever, and two washers on top of the gear. Attach the feeder cover and start by screwing in the gear
and lever screws, slowly removing the smaller screws without anything falling out. Do *not* use a lot of force to attach the screws, they should barely hold everything
in place, otherwise they might impede the movement action of the gear and lever. Both should be completely stable and not be able to ricket back and forth but should
be free to move as they please. Attach the rest of the screws, thread back the extension spring from the lever arm onto the top left screw - and you should be done.
 Knas mechanical pick-and-place tape feeder v1.0
 by
Karl Ekdahl is licensed under a
Creative Commons Attribution-NonCommercial 4.0 International License.
You can download the gerber files and preliminary STL files (generated with OpenSCAM from the gerber files, needs cleanup before use)
for the 8mm paper tape feeder
here. The materials required for this is 1/2" HDPE for the main body, 1/8" HDPE for
the body cover and 1/8" aluminium for all mechanical parts.
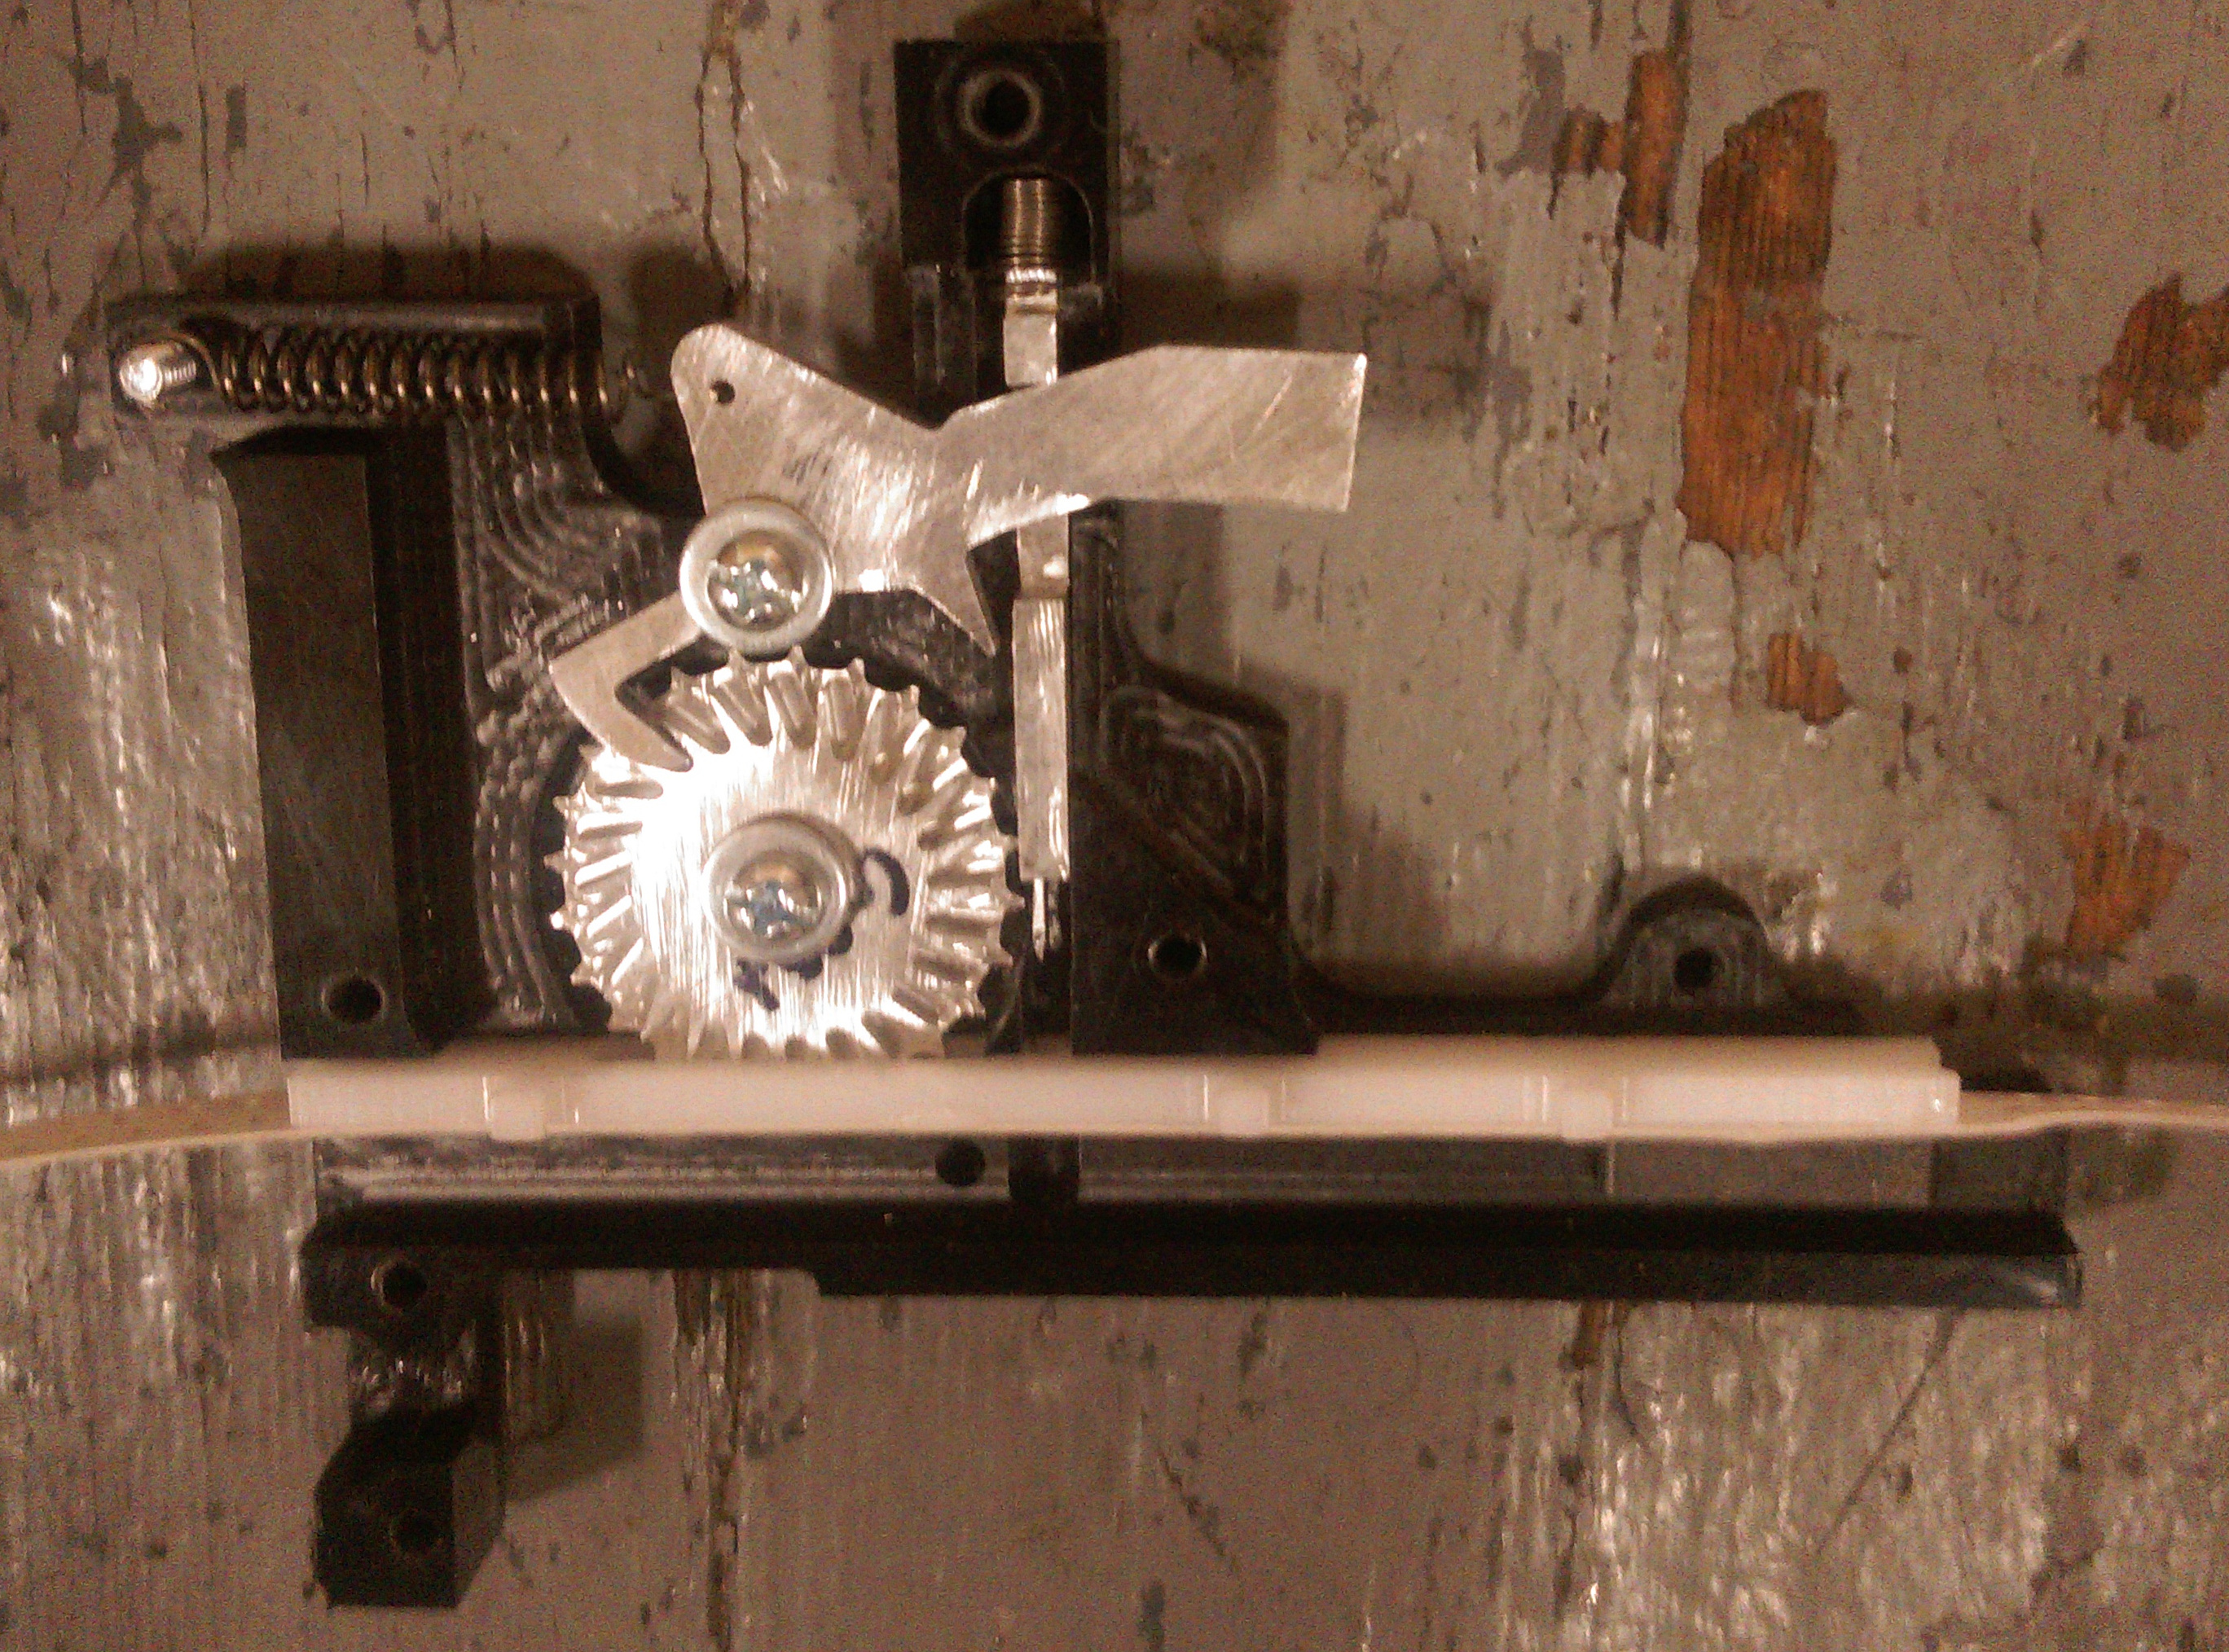
Tape feeder porn
|
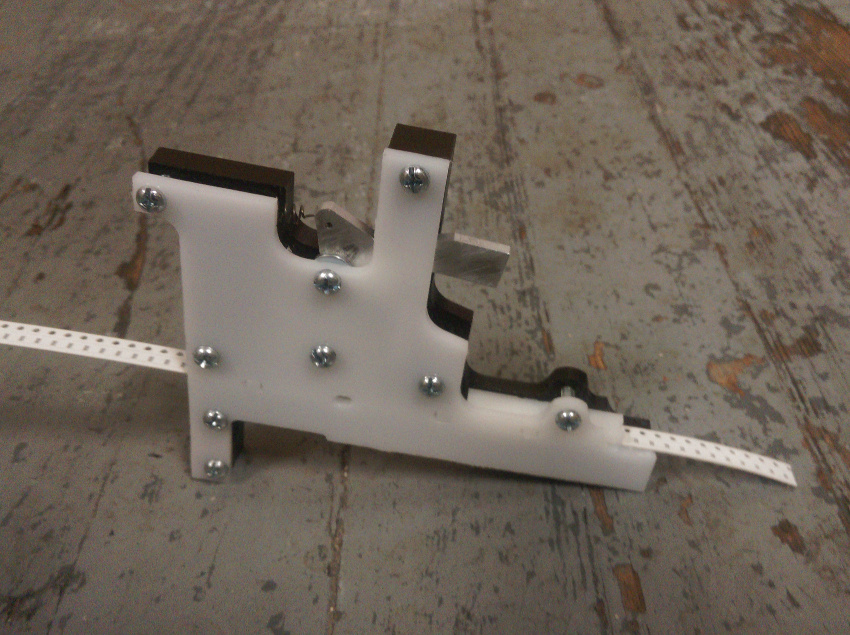
A next-to-finished prototype of the final tape feeder:
|
